# Client installation

<div id="bkmrk-"></div><p class="callout info">The **User setup** does not require Administrative rights to install, but means only the user that installed the program can use it. There is a **System setup** available, but requires Administrative rights to install. You will be able to find these options on your Service Scheduler software home page. The **User setup** is the **recommended** version.</p>

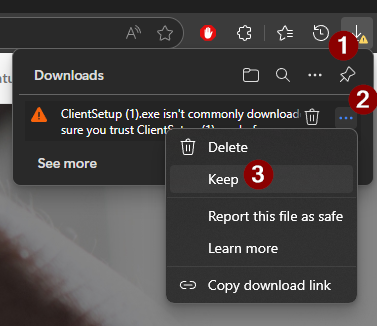
### Download client

The client is available on the from the running server instance of service scheduler. (eg [http://servsched:8090](http://servsched:8090/)) The d<span class="TextRun SCXO107529569 BCX8" data-contrast="auto" lang="EN-US" xml:lang="EN-US"><span class="NormalTextRun SCXO107529569 BCX8">efault Server Port: 8090</span></span><span class="EOP SCXO107529569 BCX8"> however this could be changed during installation. </span>

[![image.png](https://wiki.abitsystems.com.au/uploads/images/gallery/2024-06/scaled-1680-/69sxo8qagcg5EIDa-image.png)](https://wiki.abitsystems.com.au/uploads/images/gallery/2024-06/69sxo8qagcg5EIDa-image.png)

<table border="1" id="bkmrk-client---user-setup-"><colgroup><col></col><col></col></colgroup><tbody><tr><td>Client - User Setup</td><td>This will install the application in the user current profile. Admin rights are not require</td></tr><tr><td>Client - User Setup (System Wide)</td><td>This will install a stub in the program files folder and a desktop icon for all users. This will then install the application in users profile. This is helpful for workstations used by multiple users</td></tr><tr><td>Client - System Setup</td><td>This will install in Program files for all users. Requires admin rights. </td></tr></tbody></table>

### Launch client download

Once the download is complete click open file

[![image.png](https://help.abitsystems.com.au/uploads/images/gallery/2025-09/scaled-1680-/jWOimage.png)](https://help.abitsystems.com.au/uploads/images/gallery/2025-09/jWOimage.png)

Some browsers may prompt about trusting the file. Select the 3 dots "..." and press keep

<table border="1" id="bkmrk--3" style="border-collapse: collapse; width: 100%;"><colgroup><col style="width: 50%;"></col><col style="width: 50%;"></col></colgroup><tbody><tr><td>[![image.png](https://help.abitsystems.com.au/uploads/images/gallery/2025-09/scaled-1680-/h6bimage.png)](https://help.abitsystems.com.au/uploads/images/gallery/2025-09/h6bimage.png)</td><td>[![image.png](https://help.abitsystems.com.au/uploads/images/gallery/2025-09/scaled-1680-/qvgimage.png)
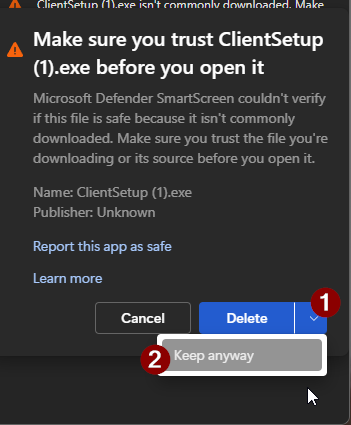
](https://help.abitsystems.com.au/uploads/images/gallery/2025-09/qvgimage.png)

</td></tr></tbody></table>

### Client Installation

Press Next until installation is finished, not options need to be changed.

[![image.png](https://help.abitsystems.com.au/uploads/images/gallery/2025-09/scaled-1680-/lCtimage.png)](https://help.abitsystems.com.au/uploads/images/gallery/2025-09/lCtimage.png)

### Client configuration

For many sites service scheduler will work immediately after installation however if a connection error occurs the server address will need to be entered manually.

[![image.png](https://help.abitsystems.com.au/uploads/images/gallery/2025-09/scaled-1680-/hX4image.png)](https://help.abitsystems.com.au/uploads/images/gallery/2025-09/hX4image.png)

Select Options -&gt; Application Server and adjust the \[AUTODISCOVER\] value to the server name or ip address of the Service Scheduler server.

<p class="callout info">
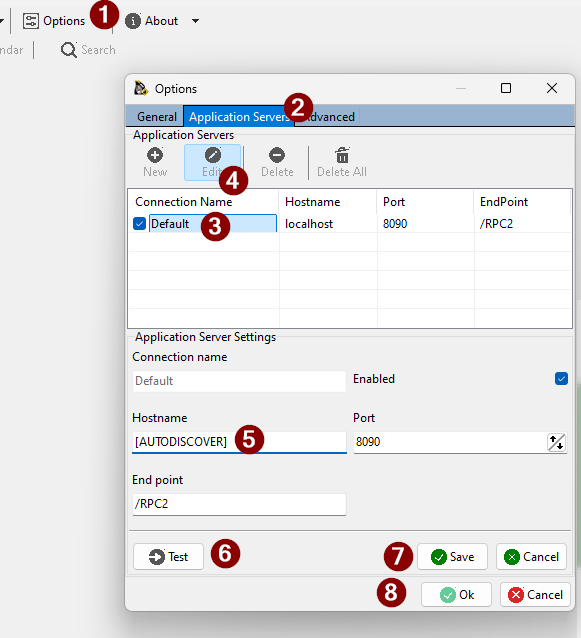
If a URL was provided for installation (eg [http://172.16.1.10:8090](http://172.16.1.10:8090)) the address would 172.16.1.10.</p>

[![image.png](https://help.abitsystems.com.au/uploads/images/gallery/2025-09/scaled-1680-/X76image.png)](https://help.abitsystems.com.au/uploads/images/gallery/2025-09/X76image.png)

Press Sign in again

[![image.png](https://help.abitsystems.com.au/uploads/images/gallery/2025-09/scaled-1680-/Jmkimage.png)
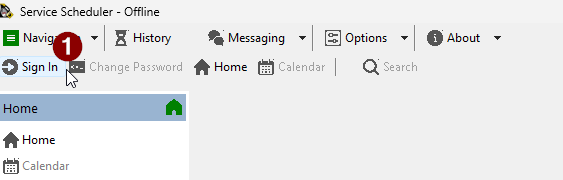
](https://help.abitsystems.com.au/uploads/images/gallery/2025-09/Jmkimage.png)