# Zero config # DNS Setup ABit software products support a DNS lookup option for clients to auto discover the server. This works using a SRV record on your DNS server. ### Create DNS record for product.domain (eg servsched.abit.local) This is an optional step but recommended step. By providing a DNS name you can easily direct users to [http://servsched:8090](http://servsched:8090) for client installation.
![](https://help.abitsystems.com.au/uploads/images/gallery/2024-08/embedded-image-af890hjf.png) Pick one of the two options, create a CNAME record to the name of the current server or a new A record entry to the IP address.
![](https://help.abitsystems.com.au/uploads/images/gallery/2024-08/embedded-image-ee2fc8cq.png) CNAME example
![](https://help.abitsystems.com.au/uploads/images/gallery/2024-08/embedded-image-tilxm9lz.png) A record example
### Create DNS SRV record
![](https://help.abitsystems.com.au/uploads/images/gallery/2024-08/embedded-image-trtdlho8.png) 
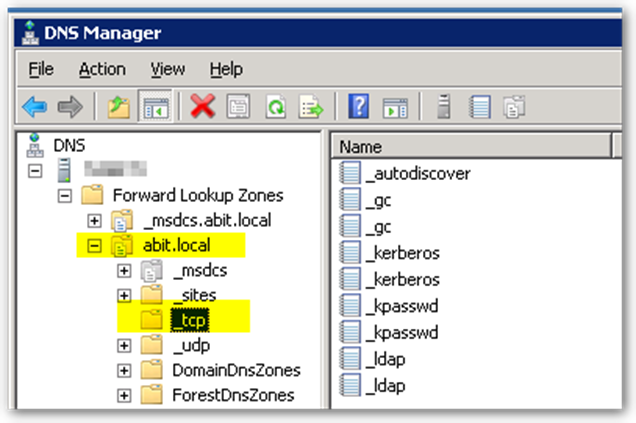
Navigate to \_tcp for your active directory domain.
![](https://help.abitsystems.com.au/uploads/images/gallery/2024-08/embedded-image-mxytgful.png) 
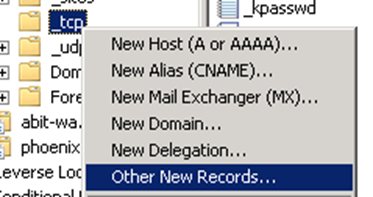
Right click and select Other New Records…
![](https://help.abitsystems.com.au/uploads/images/gallery/2024-08/embedded-image-vvaktzqc.png) 
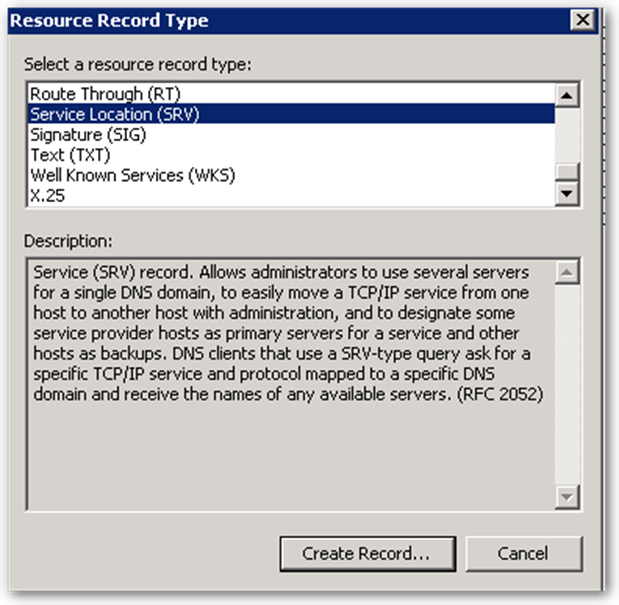
Select Service Location (SRV)
[![image.png](https://help.abitsystems.com.au/uploads/images/gallery/2024-08/scaled-1680-/yeWimage.png)](https://help.abitsystems.com.au/uploads/images/gallery/2024-08/yeWimage.png) 
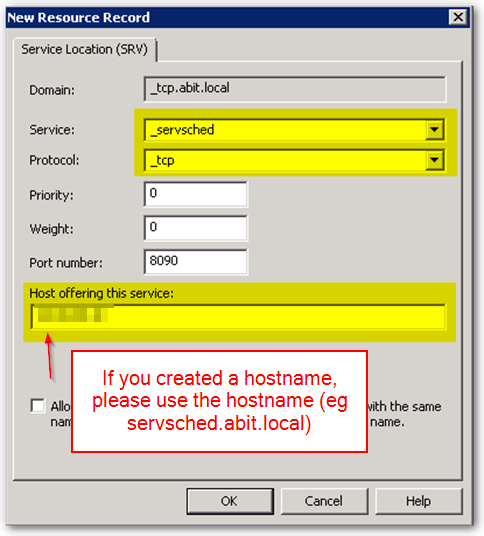
Enter a service name of \_servsched, protocol \_tcp and ensure the port number and host match your server configuration.
### Product default ports
Service Scheduler8090
Police Book8092
### Testing DNS - Click Start, and then click Run. - In the Open box, type cmd. - Type nslookup, and then press ENTER. - Type set type=all, and then press ENTER. - Type \_servsched.\_tcp.{Domain\_Name}, where Domain\_Name is the name of your domain, and then press ENTER. ```shell set type=all _servsched._tcp.{domain} ``` [![image.png](https://help.abitsystems.com.au/uploads/images/gallery/2024-08/scaled-1680-/NNVimage.png)](https://help.abitsystems.com.au/uploads/images/gallery/2024-08/NNVimage.png) # Client setup New installations will automatically have “\[AUTODISCOVER\]” as the server hostname. To transition an existing device. This hostname needs to be changed to “\[AUTODISCOVER\]” ### Manual update Select Options -> Application Servers and change the hostname to \[AUTODISCOVER\] ![](https://help.abitsystems.com.au/uploads/images/gallery/2024-08/embedded-image-rqps0s6r.png) ### Client IP Address Changes via Group Policy Using a group policy via Active Directory is the recommended way [![image.png](https://help.abitsystems.com.au/uploads/images/gallery/2024-11/scaled-1680-/4O2image.png)](https://help.abitsystems.com.au/uploads/images/gallery/2024-11/4O2image.png) Computer Configuration \\ Preferences \\ Windows Settings\\ Registry [![image.png](https://help.abitsystems.com.au/uploads/images/gallery/2024-11/scaled-1680-/moWimage.png)](https://help.abitsystems.com.au/uploads/images/gallery/2024-11/moWimage.png) #### Service Scheduler ```ini HKEY_CURRENT_USER Software\ABit Consulting\Service Scheduler\Application Servers\Default ValueName: Hostname ValueData: [AUTODISCOVER] ``` #### Police Book ```ini HKEY_CURRENT_USER Software\ABit Consulting\Police Book\Application Servers\Default ValueName: Hostname ValueData: [AUTODISCOVER] ```